Archive

Posts Tagged ‘Installation’

Set-CsFeatures.ps1 – Now With Support for Skype for Business Server 2019 and Windows Server 2019!

September 17th, 2018 7 comments

Description

I’m happy to reach another major milestone for the Set-CsFeatures.ps1 script today, after many weeks of work. This PowerShell script, which installs prerequisites and post installation configuration and tools for Lync Server and Skype for Business Server, now adds support for a few new things. This includes a new version of Skype for Business Server, as well as another operating system. The major changes are listed below. See the full list of changes in the changelog (link at the bottom of this article). Having said all of that, let’s look at all the exciting stuff…

Support for Skype for Business 2019

The script will now install the prerequisites for Skype for Business Server 2019 roles, including front-end, mediation, and edge. “But Pat”, you say – “Skype for Business 2019 isn’t even out yet”. This is true. This script adds the support so that you can hit the ground running when the RTM version is released. If you’re already playing with the Preview version in your lab, this will work there as well. Since Skype for Business Server 2019 has more features related to Office 365, including Skype for Business hybrid and online, and Microsoft Teams, rest assured that I’ll be adding more options and features to support and utilize those.

Support for Windows Server 2019

Now supported by this script are the prerequisites for Windows Server 2019 when installing Skype for Business Server 2019. What what what? That’s right, I support a not-yet released version of Skype for Business on a not-yet released operating system. Crazy? Yep. But some individuals and organizations are already working with this combination, and I wanted to provide a solution that makes life easier for them. Rest assured that as the SfB 2019 and WS2019 solutions evolve, so will this script. Version 5.0 of this script was tested against build 17744.r5 of Windows Server 2019.

Optimized code

As I’ve said before, I don’t consider myself a developer. I’m merely a coder that manages to make things work. As my skills increase, I always try to revisit existing scripts and enhance them with better ways of accomplishing tasks. Some of that is from methods available in newer versions of PowerShell, and some are just in the discovery of better avenues of approach to tasks. There are a LOT of changes in the script to reflect that. If I had to guess, I’d say at least 1000 lines of code have been touched just in the past few weeks.

Skype for Business 2019 Control Panel. Click to view full size.

Enhanced logging

While I realize most people probably never look at the resulting log files generated from this script, they can be key in knowing what’s happened on a server as well as being able to review for troubleshooting in the event of an issue. I think I’ve built and provisioned more servers in my lab to test changes in logging than anything else. There is also the built-in ‘tail’ function that allows you to watch the log file in real-time to see what’s going on ‘under the hood’.

Set-CsFeatures.ps1 log file. Click to view full size.

Latest updates for key components

There are updates for some components that have been released recently. This includes the latest cumulative update for Office Online Server, and an update for Windows Server 2012 R2 that replaces a previously required hotfix for Skype for Business Server 2015.

Feature requests

Sometimes, someone suggests a feature or alternative option to something. This version is no different, incorporating some ideas presented by the community. A few are “why didn’t I think of that” type features. An example is popping up a folder browse dialog box if the script can’t find the Windows source files, instead of just throwing an error. Please continue to send feature requests!

Bugfixes

Yeah, bugs happen. As much as I test, some people still find things, although most are just minor things like typos, or features that work differently than what someone expected or wanted. And some are ones I notice that haven’t been reported by anyone else. These pop up either in my lab testing or when I’m working on an unrelated part of the code and just notice it.

More than 8500 lines of PowerShell code mean that the script is fairly complex. Perfect? Hell no. As I mentioned above, I’m a coder. I will say that I ferociously attack known/reported issues and feature requests, and strive to make this tool as best as it can be. While I can’t test every possible combination of environments, I think I’ve accounted for a lot of possibilities.

I sincerely appreciate when people notify me of issues. Seriously. There is an option, 96, in the script that shows you how to report a bug, including what log file to send me. That really helps me address problems quicker.

Finally…

Future additions currently under consideration include at least the following:

  1. Automatically add Windows Defender exceptions (auto discovery). This feature will discover an existing Skype for Business Server 2015/2019 installation, and automatically add the required anti-virus exceptions required for Windows Defender for a healthy operating Skype for Business deployment. Since both Windows Server 2016 and 2019 include Defender components, it makes sense to include this. These exceptions are based on the official exclusion list provided by Microsoft.
  2. Debugging tools, resource kit, etc. If/when these are added for Skype for Business Server 2019, the script will be updated to support the automated installation of them.
  3. Visual C++ 2017

So, with all of this newfound goodness baked into the script, where can one download this pot of gold? Head over to the home page for the script to grab this, or any version of it. The script fully supports using Get-Help for related information. All versions including this new v5.0, are signed with my Digicert code-signing certificate to verify authenticity. Digicert really makes it easy to use certificates, and they have stellar support, too. Also, any recent version of this script will notify you of an updated version when you run it (assuming it’s run on an Internet connected machine).

The changelog for the script shows all of the changes for each new version. Any bug fixes, feature additions & updates are reflected here.

Donations

I’ve never been one to really solicit donations for my work. My offerings are created because *I* need to solve a problem, and once I do, it makes sense to offer the results of my work to the public. I mean, let’s face it: I can’t be the only one with that particular issue, right? Quite often, to my surprise, I’m asked why I don’t have a “donate” button so people can donate a few bucks. I’ve never really put much thought into it. But those inquiries are coming more often now, so I’m yielding to them. If you’d like to donate, you can send a few bucks via PayPal at https://www.paypal.me/PatRichard. Money collected from that will go to the costs of my website (hosting and domain names), as well as to my home lab.

Prereq/provisioning script being updated to include Skype for Business Server 2019

March 27th, 2018 No comments

The biggest and most popular public script I’ve ever done is Set-CsFeatures.ps1. It performs tasks such as installation and configuration of all prerequisites for any desired Lync Server 2013/Skype for Business 2015 role, as well as many post installation tasks such as installation of many tools, and configuration of many parameters. What started out as a script to make MY life easier (as are most of my scripts), I’m glad to see the adoption by others. I’m ecstatic that enough people have reported their success and details to say that literally millions of seats have been deployed with this script.

As you can imagine, it’s a substantial effort, with the latest version weighing in at around 8000 lines of PowerShell code. And it’s constantly evolving to include more than 100 options, such as the latest version of tools and applications, features requests, and bug fixes, as the changelog clearly indicates. It’s also tweaked as my own development skills evolve. It’s a true labor of love, and I’m very grateful for all of the feedback, both good and bad. Please, keep it coming! With that being said, I’m happy to report that I’m already well into adding support for Skype for Business Server 2019.

For those of you who are fortunate enough to be involved in TAP/MVP/Elite groups that give you access to the bits, I’m hoping that you’ll use this script in your labs and provide any feedback (my email address is in the header of every script I release). For everyone else, don’t expect a lot of details about things with regards to Skype for Business Server 2019 other than what’s public. TAP/MVP/Elite groups are under strict NDAs. The changes I’m adding to Set-CsFeatures.ps1 don’t reveal anything that hasn’t been announced previously.

For those who continue to use the script to deploy Skype for Business 2015, again, please continue to provide feedback. While I can’t always accommodate every request, I do what I can to implement them. And I’m extremely grateful for bug reports. Seriously. I can’t test every possible scenario, so I’m glad that you take the time to send me info so I can correct it.

Donations

I’ve never been one to really solicit donations for my work. My offerings are created because *I* need to solve a problem, and once I do, it makes sense to offer the results of my work to the public. I mean, let’s face it: I can’t be the only one with that particular issue, right? Quite often, to my surprise, I’m asked why I don’t have a “donate” button so people can donate a few bucks. I’ve never really put much thought into it. But those inquiries are coming more often now, so I’m yielding to them. If you’d like to donate, you can send a few bucks via PayPal at https://www.paypal.me/PatRichard. Money collected from that will go to the costs of my website (hosting and domain names), as well as to my home lab.

Script: Set-CsFeatures.ps1 – Easily Install Prerequisites and Tools for Lync Server 2013 and Skype for Business Server 2015/2019

October 24th, 2016 52 comments

Skype for Business PowerShell logoDescription

Installing Skype for Business and Lync servers is usually boring if you’re a consultant who does it often. Making sure the server specs are right, installing OS features, configuring NICs, etc. It’s even more boring if you’re building a bunch of servers at one time. There’s always a chance for human error, too. So why not automate as much as possible? That’s what I was after when I built the Lync Server 2010 prereq script, then the Lync Server 2013 prereq script. And it’s certainly what I’m after for Skype for Business Server 2015 and 2019. This time, however, I opted to not have a separate script for Skype for Business. Many of the requirements are the same, or just slightly different, than Lync Server 2013. So I just added the Skype for Business functionality to the 2013 script, and updated everything as a whole.

When calling the script, one only needs to specify the –Skype4b switch to put the script into “Skype for Business 2015 mode” or -Skype4b2019 for “Skype for Business 2019 mode”. Not specifying that switch cause a pop-up to appear, asking what mode you’d like. The menus don’t change based on what mode the script is in. Options for only one platform are clearly noted. Otherwise, the options automatically adjust for the platform you’ve chosen. The menu starts out with core prerequisite options for common Lync/SfB roles, followed by Microsoft tools and resources, some third-party tools and options, and then some sub-menus. Sub-menus are broken down by Misc server config, Desktop shortcuts, Taskbar shortcuts, Downloads, Security options, and Misc reports. As you can see, there are TONS of options. I’m not going to list every menu and option here, as the nature of the script means I’ll be adding/updating things as people request them, or as vendors update/alter their offerings. Just note that the options from the 2013 script have been moved around a little bit as I try to keep things organized.

This version also uses my new method of checking for updates, as mentioned in Function: Get-UpdateInfo – Making It Easy for Your Users to Get the Latest Version of Your Scripts. When a new version is available, you’ll get a pop-up notifying you.

If you’re aware of a third-party product, or even Microsoft product, that is a good match for Skype for Business servers, let me know. I’m happy to take a look and see if it would make a good addition to the script. This script has more than 100 options for prereqs, post install config, third party tools, and reports.

Super big thanks to my beta testers for supplying bug reports, suggestions, and comments.

Syntax

C:\Set-CsFeatures.ps1 [-TargetFolder <String>] [-WindowsSource <String>] [-SQLPath <String>] [-InitialMenuOption <Int32>] [-IncludeSSMS ] [-IncludeTelnet ] [-IncludeFW ] [-IncludeHighPower ] [-IncludeStandard ] [-GetInfoFromRegistry ] [-OWASOveride ] [-DownloadOnly ] [-SkipCoreCheck ] [-Tail ] [-Skype4b ] [-Skype4b2019 ] [-SkipUpdateCheck ] [-DisableAutoUpdates ] [-IncludeLanguagePack ] [-SkipEdgeNicConfig ] [-DisableWac] [-WhatIf ] [-Confirm ] [-IncludeTotalCount ] [-Skip <UInt64>] [-First <UInt64>] [<CommonParameters>]

C:\Set-CsFeatures.ps1 [-TargetFolder <String>] [-GetInfoFromRegistry ] [-DownloadAll ] [-SkipCoreCheck ] [-Tail ] [-Skype4b ] [-Skype4b2019 ] [-WhatIf ] [-Confirm ] [-IncludeTotalCount ] [-Skip <UInt64>] [-First <UInt64>] [<CommonParameters>]

C:\Set-CsFeatures.ps1 [-GetInfoFromRegistry ] [-ClearRunningStatus ] [-WhatIf ] [-Confirm ] [-IncludeTotalCount ] [-Skip <UInt64>] [-First <UInt64>] [<CommonParameters>]

C:\Set-CsFeatures.ps1 [-GetInfoFromRegistry ] [-Skype4b ] [-Skype4b2019 ] [-WhatIf ] [-Confirm ] [-IncludeTotalCount ] [-Skip <UInt64>] [-First <UInt64>] [<CommonParameters>]

Examples

.\Set-CsFeatures.ps1 -Skype4b2019

Runs script in Skype for Business Server 2019 mode. Options chosen while running in this mode are tailored to Skype for Business Server 2019. Not specifying this option will cause a pop-up prompt when the script starts, allowing a user to choose the desired mode.

.\Set-CsFeatures.ps1 -Skype4b

Runs script in Skype for Business Server 2015 mode. Options chosen while running in this mode are tailored to Skype for Business Server 2015. Not specifying this option will cause a pop-up prompt when the script starts, allowing a user to choose the desired mode.

.\Set-CsFeatures.ps1

Runs script with default values. The script will prompt for which platform (Lync Server 2013/Skype for Business Server 2015/Skype for Business Server 2019) is being installed.

.\Set-CsFeatures.ps1 -WindowsSource "d:"

Runs script with the location defined for the Windows Server installation files.

.\Set-CsFeatures.ps1 -SQLPath "d:\sqlexpress"

Runs the script and installs any required SQL Express instances in the specified location.

.\Set-CsFeatures.ps1 -TargetFolder "d:\installbits"

Runs the script, and saves any downloaded files and written logs in the specified location instead of the default “c:\_install”.

.\Set-CsFeatures.ps1 -InitialMenuOption 3

Runs the script, and automatically starts option 3 (Front End server). Once it’s finished with that option, the script functions as normal, and displays the menu. NOTE: only options from the main menu can be specified. Options in sub-menus are not available with -InitialMenuOption.

.\Set-CsFeatures.ps1 -tail

Runs script with default values, but also shows an additional PowerShell window showing a live running log file, similar to a Unix tail function. Please note that running this option may result in some popup alerts or prompts being behind the log (tail) window.

Parameters

-TargetFolder

Defines the location for any downloaded files. Defaults to “c:\_install”. Additionally, log files generated by this script are located in a sub-folder of TargetFolder called “logs”. TargetFolder does not support paths with spaces, but does support non-hidden UNC paths.

-WindowsSource

Defines the location of the Windows Server installation files. This is needed to install .Net 3.5 since those files are not installed on the server by default. Defaults to first detected CD-ROM/DVD drive. This can be a local file path, path to an .ISO file, or a non-hidden UNC path.

-SQLPath

Defines the desired installation path for SQL Express. Defaults to “c:\Program Files\Microsoft SQL Server”.

-InitialMenuOption

Allows you to start the script with the option you want, without first displaying the menu.

-IncludeSSMS

If specified, will include SQL Server Management Studio automatically when prerequisites are installed for any server that has SQL Express instances. If not specified, a prompt will appear.

-IncludeTelnet

If specified, will include Telnet automatically when prerequisites for Front End servers, Director servers, Mediation servers, Edge servers, and/or Persistent Chat servers are installed. If not specified, a prompt will appear.

-IncludeFW

If specified, will include the firewall rules for Get-CsConnections automatically when prerequisites for Front End servers are installed. If not specified, a prompt will appear.

-IncludeHighPower

If specified, tells the script to automatically set the Power Config on the server to High Power. This is instead of the script prompting. This option is available for all server roles.

-IncludeOnlineAdminTools

If specified, tells the script to automatically include the Skype for Business Online admin tools when installing prerequisites for front-end servers.

-IncludeStandard

If specified, tells the script to include the extra SQL Express instance required for Standard Edition front end servers. This is instead of the script prompting.

-GetInfoFromRegistry

This value is only used during mid-prereq reboots. It is automatically set and read by the script, and should never be manually specified.

-DownloadOnly

Tells this script to not install or configure anything – just download the files. This is useful if you’re going to be building servers that do not have Internet access and want to fetch the files beforehand. The big difference between this option and -DownloadAll, is that this option presents the normal menus, and allows you to download files for the options you pick. The -DownloadAll option downloads ALL files needed for ALL options.

-DownloadAll

Tells this script to not install or configure anything – just download ALL of the files. This is useful if you’re going to be building servers that do not have Internet access and want to fetch the files beforehand from a desktop computer. The big difference between this option and -DownloadOnly, is that this option downloads ALL files needed for ALL options, whereas -DownloadOnly allows a user to download files for specific options they choose.

-ClearRunningStatus

This switch forces the running status to be reset. This option should ONLY be used if the script exits/aborts dirty, and attempts to run the script again yield a “Script is already running” message.

-SkipCoreCheck

When specified, skips the check for Server Core. It is not meant to be called manually, as it’s used when the script needs to restart after a server reboot.

-Tail

When specified, opens another PowerShell session and tails the log file, similar to *nix. This is really only beneficial during troubleshooting.

-Skype4b

When specified, uses values specific to Skype For Business Server 2015 for prerequisites. If this option or -Skype4b2019 is NOT specified, a pop-up will appear, asking which mode the script should operate in: Lync Server 2013 or Skype for Business Server 2015, or Skype for Business Server 2019.

-Skype4b2019

When specified, uses values specific to Skype For Business Server 2019 for prerequisites. If this option of -Skype4b is NOT specified, a pop-up will appear, asking which mode the script should operate in: Lync Server 2013, Skype for Business Server 2015, or Skype for Business Server 2019.

-SkipUpdateCheck

When specified, skips the check for a newer version of the script. This option is included mainly for when the script reboots the server.

-DisableAutoUpdates

When specified, skips the prompt and automatically disables auto updates for Windows Server. If not specified, a prompt is displayed.

-IncludeLanguagePack

When specified, skips the prompt for the installation of the Office Online Server English language pack. If not specified, a prompt is displayed.

-SkipEdgeNicConfig

When specified, skips the configuration of the NICs on edge servers. This requires that you manually complete those steps.

-SkipAutoStart

When specified, will not automatically restart the script after a required reboot. The ONLY time this should be used is if you need to do something before the script starts again, like manually mounting an ISO file that the script needs.

-DisableWac

When specified, will automatically disable the Windows Action Center prompt when Server Manager is launched on Windows Server 2019. This can be crucial, as installing Windows Admin Center can cause some conflicts with some of the IIS settings for Skype for Business Server 2019. If this is not specified, and the script is running on Windows Server 2019, a prompt will appear.

-DomainSuffix

When specified, is used for the domain suffix configured on edge servers. If not specified, a prompt will appear to enter a domain suffix.

-DisableFPSharing

When specified, will disable Microsoft File and Printer Sharing. This is useful when building edge servers. If not specified, a prompt will appear at the appropriate time in the build process.

-DisableLmHosts

When specified, will disable LMHosts file lookup. This is useful when building edge servers. If not specified, a prompt will appear at the appropriate time in the build process.

-DisableNetBios

When specified, will disable NetBIOS. This is useful when building edge servers. If not specified, a prompt will appear at the appropriate time in the build process.

-IncludeTrustedCerts

Automatically adds trusted certificates to edge servers. This includes comodo, digicert, entrust, geotrust, globalsign, godaddy, letsencrypt, networksolutions, ssl, swisssign, symantec, thawte, and wisekey.

Installation

No installation is necessary.

Execution Policy: Third-party PowerShell scripts may require that the PowerShell Execution Policy be set to either AllSigned, RemoteSigned, or Unrestricted. The default is Restricted, which prevents scripts – even code signed scripts – from running. For more information about setting your Execution Policy, see Using the Set-ExecutionPolicy Cmdlet.

Donations

I’ve never been one to really solicit donations for my work. My offerings are created because *I* need to solve a problem, and once I do, it makes sense to offer the results of my work to the public. I mean, let’s face it: I can’t be the only one with that particular issue, right? Quite often, to my surprise, I’m asked why I don’t have a “donate” button so people can donate a few bucks. I’ve never really put much thought into it. But those inquiries are coming more often now, so I’m yielding to them. If you’d like to donate, you can send a few bucks via PayPal at https://www.paypal.me/PatRichard. Money collected from that will go to the costs of my website (hosting and domain names), as well as to my home lab.

Known Issues

The only issue I’m aware of at the release of the latest version is that pinning shortcuts to the taskbar in Windows Server 2016 doesn’t seem to be working, and doesn’t work at all in Windows Server 2019. If you come across something, please let me know. Contact info is in the header of the script, and the script also has option 96, ‘how to report a bug’ that will tell you what information is critical when reporting a problem (including where the log file is).

Frequently Asked Questions

Question: Does the script support Windows Server 2019?

Answer: Yes – starting with version 5.0, prerequisites for Windows Server 2019 are included for Skype for Business Server 2019.


Question: Does this script support Windows Server 2016?

Answer: Yes – starting with version 4.20, prerequisites for Windows Server 2016 are included.


Question: Why doesn’t this script support Windows Server 2008 R2 and earlier?

Answer: I used to get asked this all the time. There are several reasons. The first is that out of the box, Server 2008 R2 has PowerShell 2.0 installed, and this script is written in PowerShell 3.0. Requiring you to upgrade to PowerShell 3.0 first, before running a script that installs prerequisites, seems counter-intuitive. And converting the script to just use PowerShell 2.0 is taking a step backwards, especially considering that the current version of PowerShell is 5.x.

Next is sheer time. I test changes I make. And then I test them again. And then I choose different options and combinations and test them. Testing on just Server 2012, Server 2012 R2, Server 2016, and Server 2019 is exhausting. Adding Server 2008 R2 would mean even more testing, plus I’d have to add those resources in my already overtaxed test labs. That would slow down my ability to add new features and test fixes.

Third is that Server 2008 R2 is four versions back. Get with the times already!


Question: Can you add feature x?

Answer: I LOVE getting feature requests. Seriously! Best method to suggest features is to send me an email. My email address is in the comment section at the top of every script I publish. Please be detailed in what you’d like to see, as well as any scenarios you’d use the option (so I can try to duplicate testing). This also goes for additional tools, whether Microsoft or third-party.


Question: How do I submit bug reports?

Answer: Email is best. Grab my email address from the comment section at the top of the script. Please be VERY detailed. Please include screen shots if possible, and ALWAYS include the log file. If the script will start, select option 96, “Report a bug/problem with this script”. If you’re not using the latest version of the script, please download it from the Downloads section below and see if you can duplicate the problem before reporting it.


Question: What if my server doesn’t have Internet access?

Answer: Fear not. Download the required files using either the -DownloadOnly or -DownloadAll options from another machine and place them in the TargetFolder, which is c:\_install by default. The script looks to see if the file is available locally before attempting to download. An exception to this is the latest cumulative update, which is always downloaded, since the URL and file name don’t change, even when the version does.


Question: When I run the script again, I get “Script already running”

Answer: This is because the script didn’t exit gracefully previously. Many reasons this can happen, such as rebooting the server while it’s still running. If you’re positive it’s not running anywhere else (including by other users logged into the same server), run the script with the -ClearRunningStatus switch to clear that flag. Then run it as normal.


Question: Is there an option to specify where (i.e. path) all of the various tools are installed?

Answer: No. And not for a lack of trying. Some tools don’t support automated installs with a specified path. And some of those that DO, actually still dump some core files in a “default” location. The more I tried to come up with the solution, the more I realized that it would entail a substantial amount of overhead in the script.


Question: Why does the script report an unsupported version of .NET Framework?

Answer: Because Lync Server 2013 and Skype for Business Server 2015 don’t support the version detected. Once they do, I’ll adjust the script accordingly.


Question: Can I run the script more than once?

Answer: Absolutely. The script was designed to not only support running more than once, but also to be safe if run on a working Lync/Skype for Business server. HOWEVER, I wouldn’t recommend running the script in a different mode (Lync/SfB 2015/Sfb 2019) than what was run previously. That could be problematic.


Question: Why do I get prompted for some things? Can’t I run the script without all of those prompts?

Answer: The prompts are for things that are not explicitly required for the installation of the role you’ve chosen (according to official Microsoft documentation), but are recommended. The telnet client is a perfect example. It’s not required for any role, but I’ve found a lot of people install it to help with functionality testing and troubleshooting. So, optional items involve a prompt. Can you run without the prompts? Yep. Plenty of options when calling the script to accept some optional features. In the example of telnet, -IncludeTelnet will install the telnet client without prompting. For a complete list of command line options, see the parameter section above, or run ‘Get-Help Set-CsFeatures.ps1’


Download

v5.5 – 08-12-2019 – Set-CsFeatures.v5.5.zip Code signed with Digicert Code Signing certificate

v5.4 – 12-26-2018 – Set-CsFeatures.v5.4.zipCode signed with Digicert Code Signing certificate

v5.3 – 11-21-2018 – Set-CsFeatures.v5.3.zipCode signed with Digicert Code Signing certificate

v5.2 – 11-11-2018 – Set-CsFeatures.v5.2.zip Code signed with Digicert Code Signing certificate

v5.1 – 10-05-2018 – Set-CsFeatures.v5.1.zip Code signed with Digicert Code Signing certificate

v5.0 – 09-17-2018 – Set-CsFeatures.v5.0.zip Code signed with Digicert Code Signing certificate

v4.9 – 08-31-2018 – Set-CsFeatures.v4.9.zip Code signed with Digicert Code Signing certificate

v4.8 – 03-10-2018 – Set-CsFeatures.v4.8.zip Code signed with Digicert Code Signing certificate

v4.7 – 02-23-2018 – Set-CsFeatures.v4.7.zip Code signed with Digicert Code Signing certificate

v4.6 – 01-19-2018 – Set-CsFeatures.v4.6.zip Code signed with Digicert Code Signing certificate

v4.5 – 12-21-2017 – Set-CsFeatures.v4.5.zip Code signed with Digicert Code Signing certificate

v4.4 – 11-12-2017 – Set-CsFeatures.v4.40.zip Code signed with Digicert Code Signing certificate

v4.30 – 10-11-2017 – Set-CsFeatures.v4.30.zip Code signed with Digicert Code Signing certificate

v4.20 – 09-04-2017 – Set-CsFeatures.v4.20.zip Code signed with Digicert Code Signing certificate

v4.10 – 05-15-2017 – Set-CsFeatures.v4.10.zip Code signed with Digicert Code Signing certificate

v4.09 – 05-13-2017 – Set-CsFeatures.v4.09.zip Code signed with Digicert Code Signing certificate

v4.08 – 04-19-2017 – Set-CsFeatures.v4.08.zip Code signed with Digicert Code Signing certificate

v4.07 – 04-14-2017 – Set-CsFeatures.v4.07.zip Code signed with Digicert Code Signing certificate

v4.06 – 02-05-2017 – Set-CsFeatures.v4.06.zip Code signed with Digicert Code Signing certificate

v4.05 – 11-04-2016 – Set-CsFeatures.v4.05.zip Code signed with Digicert Code Signing certificate

v4.04 – 11-02-2016 – Set-CsFeatures.v4.04.zip Code signed with Digicert Code Signing certificate

v4.03 – 11-01-2016 – Set-CsFeatures.v4.03.zip Code signed with Digicert Code Signing certificate

v4.02 – 10-28-2016 – Set-CsFeatures.v4.02.zip Code signed with Digicert Code Signing certificate

v4.01 – 10-25-2016 – Set-CsFeatures.v4.01.zip Code signed with Digicert Code Signing certificate

v4.0 – 10-24-2016 – Set-CsFeatures.v4.0.zip Code signed with Digicert Code Signing certificate

Changelog

See the changelog for information on what’s changed/included in each version.

Automatically Installing and Configuring WireShark for Skype for Business

October 7th, 2016 5 comments

wiresharkDescription

I mention in the blog article Script: Set-Cs2013Features.ps1 – Easily Install Prerequisites and Tools for Microsoft Lync Server 2013 that one of the options in the menu, #30, is download, install, and configure WireShark on Windows Server. The configuration settings are based on those mentioned by Jeff Schertz (Wireshark Capture Tips) and Matt Landis (Getting Started With Lync and Wireshark: Tips & Quirks) , as well as those I’ve found useful. Most of these settings REALLY help when you’re looking at traces (and who doesn’t love an afternoon of doing that?). Among some of the configuration settings are:

  1. adds Source Port (resolved) column
  2. adds Destination Port (resolved) column
  3. adds DSCP column
  4. Configures RTP protocol “Try to decode RTP outside of conversations”
  5. Configures SIP protocol for ports 5060-5068 (instead of WireShark’s default of 5060)
  6. Sets the time format to human readable format

Why manually configure these on your server (or worse, many servers), if we can automate it? Let’s make our deployment life easier. Getting WireShark installed programmatically isn’t like other programs. There is no .msi file, or silent install switches. Methods I’ve used in other scripts just didn’t work. And believe me, I tried. And tried. And tried. So, I went medieval on it, and used AutoIt to create a macro that steps through the installer, clicking the right buttons. This works exceptionally well, and is fairly fast. But I wanted to also include the configuration steps mentioned above. And this is where it got interesting. WireShark’s config file seems to change formats and details often. So writing something that would change the config file directly seemed like it would be a losing battle. So, back to AutoIt. For 95% of the config, it worked great. But there seemed to be a need to click on the custom columns in order to set their name. AutoIt allows for moving the mouse to a certain vector, then clicking. But even with maximizing everything, the coordinates were never the same on different servers with different resolutions or RDP sessions. So that part of it would often not work. You’d get the columns, but they’d be named “New Column”. Not ideal. Finally, after taking a break from trying to figure that out, I rethought about it, and was able to figure out the right keyboard combination to accomplish the same thing. Success! There is one section right after that where the mouse is required to move the new columns into the desired order, but that seems to always work, and there’s no keyboard control for that. A remaining issue has been there since I first started this task. And that is the fact that AutoIt is written to take action based on app windows with certain titles. Usually not an issue at all, except that WireShark has always included the version number in the title bar. So every time there is a new version released, I’d have to open the source file, change the version number, re-compile to an .exe file, test, upload to my server, and update the prereq script. All in all, it is like 10 minutes of work, but I’ll need to continue to do that. As a result, I’m releasing the macros bundled the appropriate version of WireShark. Not sure if that violates some license with WireShark, but since they seem uninterested in making a silent installer method… Download the file from the link below. Unzip anywhere, as long all of the files are in the same folder. You’ll see there are three files:

  1. The WireShark bits, which are named with the version number, such as Wireshark-win64-2.2.1.exe for version 2.2.1. This is the file as it comes from WireShark.
  2. The installer macro, which is also named according to the WireShark version it applies to, such as WireShark_2.2.1-install.exe
  3. The config macro, which is also named according to the WireShark version it applies to, such as WireShark_2.2.1-config.exe

Run the installer macro first by double clicking on it. You’ll see it zip through the WireShark install routine. Once that closes, you can run the config macro. You’ll see it walk though the config. I do NOT recommend running the config macro more than once – lest you end up with a completely mangled config. It takes a minute or so to run. Once it’s done, you can open WireShark Legacy and use it. Once you start a trace, you should immediately be able to see the added columns:

ports

Added columns in WireShark. Click for a larger version.

If you wander through the config menus, you’ll see the other settings as well. The v2.x WireShark application that is also installed when you install WireShark is configured somewhat differently, and I’ll address that in the future. Right now, I’m not aware that it provides any added benefit for Skype for Business/Lync admins anyways. But really, WireShark, would it kill you to use an XML file for your config?! Or registry values? If you have some specific config settings you use for WireShark, pass them along!

Note that this installation has only been tested on Windows Server 2012R2 and later. I haven’t tested this on desktop OSes.

Donations

I’ve never been one to really solicit donations for my work. My offerings are created because *I* need to solve a problem, and once I do, it makes sense to offer the results of my work to the public. I mean, let’s face it: I can’t be the only one with that particular issue, right? Quite often, to my surprise, I’m asked why I don’t have a “donate” button so people can donate a few bucks. I’ve never really put much thought into it. But those inquiries are coming more often now, so I’m yielding to them. If you’d like to donate, you can send a few bucks via PayPal at https://www.paypal.me/PatRichard. Money collected from that will go to the costs of my website (hosting and domain names), as well as to my home lab.

Downloads

WireShark v2.2.12 – 01-19-2018 – WireShark_2.2.12-install.zip

WireShark v2.2.10 – 10-22-2017 – WireShark_2.2.10-install.zip

WireShark v2.2.9 – 09-04-2017 – WireShark_2.2.9-install.zip

WireShark v2.2.7 – 06-01-2017 – Wireshark_2.2.7-install.zip

WireShark v2.2.6 – 04-12-2017 – Wireshark_2.2.6-install.zip

WireShark v2.2.5 – 03-06-2017 – Wireshark_2.2.5-install.zip

WireShark v2.2.4 – 01-31-2017 – Wireshark_2.2.4-install.zip

WireShark v2.2.3 – 12-23-2016 – Wireshark_2.2.3-install.zip

WireShark v2.2.2. – 11-24-2016 – WireShark_2.2.2-install.zip

WireShark v2.2.1 – 10-07-2016 – WireShark_2.2.1-install.zip

Changelog

See the changelog for information on what’s changed/included in each version.

Writing a Book – A Labor of Love

October 5th, 2016 1 comment

book-coverAny tech types who’ve written tech books can attest to the fact that it’s a LOT of work. And this one was no different. Skype for Business is a very dynamic product, with features being added and updated on a continuing basis. Fortunately, I had the chance to work with some great tech luminaries – people far smarter than me, for Skype for Business Unleashed. That includes Phil Sharp, Rui Maximo, and Alex Lewis. But don’t let the fact that there are four names on the cover fool you. Plenty of others work behind the scenes, including contributing authors, editors, and publisher staff. I can’t possibly name them all, but I would like to point out a few. Stale Hansen stepped up and wrote a killer chapter on the VDI components of Skype for Business, while John Cook handled, what else, the Mac client chapter. Tom Morgan, one of Modality Systems’ ace developers, wrote on Developing Skype for Business Solutions. Former colleagues Tom Arbuthnot and Iain Smith also contributed. Even ‘The Hoff’ himself, Ken Lasko, added some great info. And to keep us all true to the product, Tim Harrington served as the tech editor. Jamie Stark, a beloved Program Manager in the Skype product group at Microsoft, wrote a killer forward.

During the project, several events occurred that seemed to derail the project. The publisher, Pearson, eliminated 4000 staff in a corporate downsizing. This was also around the time that Microsoft Press also underwent a significant restructuring. The project was in doubt for a while, but Pearson came back, committed to getting the book on to the shelves. Our normal full time gigs, family lives, and other interests also came into play. And unfortunately, someone involved in the book suffered a tragic loss. All of these caused the project timeline to slip. And during this time, the product group kept working on the product. Each time a Cumulative Update was released, we would have to review what had already been written to verify it still was valid, including details, screen shots, PowerShell commands, and more.

So why write this book? We certainly aren’t getting rich doing it. In fact, we’d all likely agree that you can’t survive on writing books at this pace. And time spent away from family and friends, and other interests can be tough. But seeing it on the shelf is rewarding on so many levels. It’s great to add the publication to your resume, LinkedIn profile, and more. Name recognition is always nice. But more importantly, getting the knowledge and experience into a format that can be beneficial to others is extremely personally rewarding to me. Is every little tidbit in there? Of course not. The book is 1100 pages. Decisions were made on how much space we could to allocate to each topic. Some chapters could be exponentially larger. But we tried to touch on the important stuff. Enough to get an environment properly designed, build, configured, and administered. And I think we did pretty well in that regard. And of course, as soon as we turned in the final edits, new features were released by the product group.

Books don’t sell unless people know about them. So we don our marketing hats and get on LinkedIn, Twitter, Facebook, blogs, and other online resources and let the world know it’s out there. Modality Systems was generous enough to put together a book signing event at Microsoft Ignite, and gave away some signed copies, as well. Twitter followers even started sending in pictures of where the book had been sighted, including the Microsoft Conference Store, MIT, and more. A signed copy even made its way to Gurdeep Pall‘s desk. Gurdeep is the Corporate Vice President of the Skype business unit at Microsoft, and he tweeted a selfie of himself holding the book. As I write this article, the book is the highest ranked Skype for Business book on Amazon. And that’s no easy task, as the other books were also written by some other top notch nerds like us.

cth_vttw8aij5ka-jpg-large

Book signing event at Microsoft Ignite 2016. From left to right: Stale Hansen, Phil Sharp, me, Rui Maximo, and Tom Morgan.

I again want to thank everyone involved. It would not have been possible without them. I’d also like to thank the entire Product Group, as well as the Skype for Business MVPs. Both of these groups were instrumental in answering questions that popped up throughout this process.

I hope you enjoy the book, and welcome any comments or concerns.

Script: Install-OfficeWebAppsLanguagePacks.ps1 – Easier Installation of Selected Language Packs

March 7th, 2015 No comments

PowerShell-logo-128x84Description

I was working with a global customer lately who has datacenters in various global regions (as most global orgs do). The customer had not decided, and basically, hadn’t even thought about what language packs to install on their Office Web Apps Servers (OWAS). I suggested that there are 49 language packs including the English pack that I install by default on every OWAS server. Those languages are:

Azeri (Latin)
Basque
Bosnian (Latin)
Bulgarian
Catalan
Chinese (Simplified)
Chinese (Traditional)
Croatian
Czech
Danish
Dari
Dutch
English
Estonian
Finnish
French
Galician
German
Greek
Hebrew
Hindi
Hungarian
Indonesian
Irish – Ireland
Italian
Japanese
Kazakh
Korean
Latvian
Lithuanian
Macedonian (FYROM)
Malay (Malaysia)
Norwegian (Bokmal)
Polish
Portuguese (Brazil)
Portuguese (Portugal)
Romanian
Russian
Serbian (Cyrillic)
Serbian (Latin)
Slovak
Slovenian
Spanish
Swedish
Thai
Turkish
Ukranian
Vietnamese
Welsh

The customer decided on which language packs to install.

If you’ve ever tried to install these, you know you go to the language pack download page, and pick your desired language. When the next page comes up, you notice that it’s in the language of the desired language pack. You hope you’re clicking on the right link, download the file, then run the installer, which is mostly in the desired language, and go from there. It can be somewhat confusing, but extremely repetitive – especially if you’re installing a lot of language packs. It got me thinking that this was an area ripe for automation (what area isn’t?).

Well, as I’ve mentioned on this blog before, I’m lazy (as most coders are). So I wrote this script to make my life easier, and as a result, you gain from it. Here’s what the script does:

  1. Detects which (if any) language packs are installed on the local machines. This is accomplished by looking for the correct GUID in the Uninstall branch of the registry.
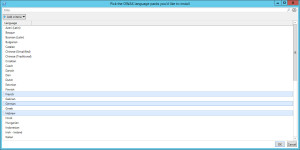
  2. Displays a grid list of the language packs that are available and not already installed on the machine (see image below). You can select one or more language packs to install and click “Ok”.
  3. The script will download the language pack(s)
  4. It will mount (if they are an .img file), or extract (if an .exe).
  5. It will silently install the language pack
  6. It will clean up after itself (unmount or clean up extracted files)

Here is the selection list presented. Notice that English is not in the list as that language pack is already installed.

OWAS language pack selection

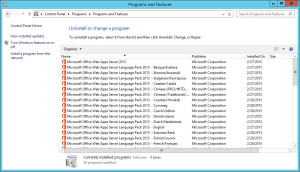
Once installation is completed, you’re left with your language packs installed and a nice little log file.

OWAS post installation

Extract the files to any folder. The script and the .csv file MUST be in the same folder. Run it by calling Install-OWASLanguagePack.ps1 and it will default to using the following path structure (which it will create if it doesn’t already exist):

Path Purpose 
c:\_Install Root working folder. Can be changed using -TargetFolder when calling the script.
c:\_Install\logs Log files from the script are stored here
c:\_Install\OWASLanguagePacks Downloaded language pack files are stored here. Folder name can be changed using -OWASLanguagePackFolder. Language packs are placed in sub folders of this folder. The sub folders match the language of the language pack.

A little bit of a rant. I *REALLY* wish the language packs were an MSI file that supported silent install instead of an .img file that must be mounted or an .exe that must be extracted, and then each called with complex syntax.

Syntax

Install-OWASLanguagePacks.ps1 [[-TargetFolder]][[-OWASLanguagePackFolder]] [-WhatIf] [-Confirm] [-IncludeTotalCount] [-Skip] [-First][<commonparameters>]

Installation

Execution Policy: Third-party PowerShell scripts may require that the PowerShell Execution Policy be set to either AllSigned, RemoteSigned, or Unrestricted. The default is Restricted, which prevents scripts – even code signed scripts – from running. For more information about setting your Execution Policy, see Using the Set-ExecutionPolicy Cmdlet.

Donations

I’ve never been one to really solicit donations for my work. My offerings are created because *I* need to solve a problem, and once I do, it makes sense to offer the results of my work to the public. I mean, let’s face it: I can’t be the only one with that particular issue, right? Quite often, to my surprise, I’m asked why I don’t have a “donate” button so people can donate a few bucks. I’ve never really put much thought into it. But those inquiries are coming more often now, so I’m yielding to them. If you’d like to donate, you can send a few bucks via PayPal at https://www.paypal.me/PatRichard. Money collected from that will go to the costs of my website (hosting and domain names), as well as to my home lab.

Assumptions

None

Download

v1.0 – 03-07-2015 – Install-OWASLanguagePacks.v1.0.zip

Changelog

See the changelog for information on what’s changed/included in each version.

Quality of Service (QoS) Calculator – Plan Your Network, GPO, and Lync/Skype for Business Config More Easily

November 5th, 2014 25 comments

Description

When deploying Microsoft Lync/Skype for Business Server, network health and configuration can be crucial.

The QoS Calculator allows you to pick and choose what components and clients will be used in your environment as well as which specific clients. You’re also able to pick a starting port number, port count, and DSCP value for each modality. The calculator will ensure that port ranges are consecutive, and that they don’t extend past 65535. The calculator will list all relevant Group Policy Object (GPO) settings, as well as the PowerShell commands needed to configure Lync/Skype for Business Server. Clients available for configuration include Lync 2010 and Lync 2013 full client, Lync 2010 Attendant and Landis Computer’s Attendant Pro attendant clients, Windows Store App client, Lync Phone Edition, and more. Server side options include A/V conferencing, application sharing, Response Group Service applications, Conference Announcement service, Call Park, UCMA apps, PSTN audio, A/V Edge services, Exchange UM, and the VDI client.

To start with, go to the INPUT tab. Any of the green cells can be changed. Reset buttons allow you to set port and port count settings back to their original values. Future releases will also reset the DSCP values as well (just need to figure out how to do that in Office VBA). Red cells indicate an error (missing or incorrect data).

1

Enter your Front End and Edge pool FQDNs. If you have a separate mediation pool, enter that name as well. The values defined here are used to compose the PowerShell commands needed to configure Lync/Skype for Business Server.

2

You can show/hide different policy types using the appropriate check boxes.

qoscalculator3

If your Mediation role is collocated with your Front End servers, check the box. This will combine the appropriate GPO policies together.

qoscalculator4

Changes to green cells are immediately reflected elsewhere in the calculator.

Once you have the values entered/verified, go to the POLICIES tab to see a list of GPO settings needed. Check out Elan Shudnow’s awesome Enabling QoS for Lync Server 2013 and Various Clients and Jeff Schertz’s Lync Quality of Service Behavior for a deep dive into setting up QoS.

Next, go to the POWERSHELL-SERVER tab, and you’ll see the relevant Lync/Skype for Business Management Shell commands to configure the server-side based on the info you supplied. Copy and paste each into Lync/Skype for Business Server Management Shell.

Now, go to the POWERSHELL-GPO tab, and you can copy and paste PowerShell code into a PowerShell console on a domain controller to automatically create and configure the Group Policy Objects for server and client machines.

Lastly, the Registry-Edge tab contains the PowerShell code that updates the local security policy on the edge servers is used to configure QoS, since GPOs aren’t used in non-domain joined machines. It’s important that these commands be run in an elevated PowerShell session.

I have tons of ideas for more features and functionality. Feel free to comment below on things you’d like to see in future versions.

Syntax

None

Installation

None. Just open the file in Excel. As this is a macro based file, you’ll need to enable content when prompted.

Assumptions

None

Download

v1.7 – 02/28/2017 – QoS-Calculator-v1.7.xlsm

v1.6 – 12-19-2016 – QoS Calculator v1.6.xlsm

v1.5 – 11-04-2016 – QoS-Calculator-v1.5.xlsm

v1.4 – 09-13-2016 – QOS Calculator v1.4.xlsm

v1.3 – 04-26-2016 – Lync 2013 QoS Calculator v1.3.xlsm

v1.2 – 02-27-2015 – Lync 2013 QoS Calculator v1.2.xlsm

v1.1 – 01-26-2015 – Lync 2013 QoS Calculator v1.1.xslm

v1.0 – 11-5-2014 – Lync 2013 QoS Calculator v1.0.xlsm

Changelog

See the changelog for information on what’s changes/included in each version.

Function: Set-TimeZone – Configure Time Zone via PowerShell

March 4th, 2013 1 comment

Powershell_logo-137x137Note: This functionality was added into PowerShell version 3.1.For more information, see https://msdn.microsoft.com/en-us/powershell/reference/5.1/microsoft.powershell.management/set-timezone

It’s easy to just double-click on the time in the system tray and set the time and time zone when building a new server. You may even have a GPO that does this for you. That’s all fine and dandy. But GPOs don’t work for member servers, and if you build a lot of servers, like I do, it’s a repetitive task – something perfectly suited for PowerShell.

With this function, we do nothing more than call tzutil.exe with the timezone name. Nothing fancy. I added some validation to make sure that the timezone specified is truly one of the 100 valid time zones that tzutile.exe should recognize and accept.

So, now, in your server provisioning script, merely call the function, Set-TimeZone, with the desired timezone. For example:

Set-TimeZone "Pacific Standard Time"

The script defaults to “Eastern Standard Time” if you don’t supply a timezone. That’s it. There is no screen output for this function. Here’s the function:

function Set-TimeZone {
  [CmdletBinding(SupportsShouldProcess = $True)]
  param( 
    [Parameter(ValueFromPipeline = $False, ValueFromPipelineByPropertyName = $True, Mandatory = $False)]
    [ValidateSet("Dateline Standard Time","UTC-11","Hawaiian Standard Time","Alaskan Standard Time","Pacific Standard Time (Mexico)","Pacific Standard Time","US Mountain Standard Time","Mountain Standard Time (Mexico)","Mountain Standard Time","Central America Standard Time","Central Standard Time","Central Standard Time (Mexico)","Canada Central Standard Time","SA Pacific Standard Time","Eastern Standard Time","US Eastern Standard Time","Venezuela Standard Time","Paraguay Standard Time","Atlantic Standard Time","Central Brazilian Standard Time","SA Western Standard Time","Pacific SA Standard Time","Newfoundland Standard Time","E. South America Standard Time","Argentina Standard Time","SA Eastern Standard Time","Greenland Standard Time","Montevideo Standard Time","Bahia Standard Time","UTC-02","Mid-Atlantic Standard Time","Azores Standard Time","Cape Verde Standard Time","Morocco Standard Time","UTC","GMT Standard Time","Greenwich Standard Time","W. Europe Standard Time","Central Europe Standard Time","Romance Standard Time","Central European Standard Time","W. Central Africa Standard Time","Namibia Standard Time","Jordan Standard Time","GTB&nbsp;Standard Time","Middle East Standard Time","Egypt Standard Time","Syria Standard Time","E. Europe Standard Time","South Africa Standard Time","FLE&nbsp;Standard Time","Turkey Standard Time","Israel Standard Time","Arabic Standard Time","Kaliningrad Standard Time","Arab Standard Time","E. Africa Standard Time","Iran Standard Time","Arabian Standard Time","Azerbaijan Standard Time","Russian Standard Time","Mauritius Standard Time","Georgian Standard Time","Caucasus Standard Time","Afghanistan Standard Time","Pakistan Standard Time","West Asia Standard Time","India Standard Time","Sri Lanka Standard Time","Nepal Standard Time","Central Asia Standard Time","Bangladesh Standard Time","Ekaterinburg Standard Time","Myanmar Standard Time","SE Asia Standard Time","N. Central Asia Standard Time","China Standard Time","North Asia Standard Time","Singapore Standard Time","W. Australia Standard Time","Taipei Standard Time","Ulaanbaatar Standard Time","North Asia East Standard Time","Tokyo Standard Time","Korea Standard Time","Cen. Australia Standard Time","AUS Central Standard Time","E. Australia Standard Time","AUS Eastern Standard Time","West Pacific Standard Time","Tasmania Standard Time","Yakutsk&nbsp;Standard Time","Central Pacific Standard Time","Vladivostok Standard Time","New Zealand Standard Time","UTC+12","Fiji Standard Time","Magadan&nbsp;Standard Time","Tonga Standard Time","Samoa Standard Time")]
    [ValidateNotNullOrEmpty()]
    [string]$TimeZone = "Eastern Standard Time"
  ) 

  $process = New-Object System.Diagnostics.Process 
  $process.StartInfo.WindowStyle = "Hidden" 
  $process.StartInfo.FileName = "tzutil.exe" 
  $process.StartInfo.Arguments = "/s `"$TimeZone`"" 
  $process.Start() | Out-Null 
} # end function Set-TimeZone

Donations

I’ve never been one to really solicit donations for my work. My offerings are created because *I* need to solve a problem, and once I do, it makes sense to offer the results of my work to the public. I mean, let’s face it: I can’t be the only one with that particular issue, right? Quite often, to my surprise, I’m asked why I don’t have a “donate” button so people can donate a few bucks. I’ve never really put much thought into it. But those inquiries are coming more often now, so I’m yielding to them. If you’d like to donate, you can send a few bucks via PayPal at https://www.paypal.me/PatRichard. Money collected from that will go to the costs of my website (hosting and domain names), as well as to my home lab.

Script: Set-Cs2013Features.ps1 – Easily Install Prerequisites and Tools for Microsoft Lync Server 2013

February 8th, 2013 131 comments

Lync 2013 logo 128x128Note: This script is now deprecated. Please see the newer Script: Set-CsFeatures.ps1 – Easily Install Prerequisites and Tools for Lync Server 2013 and Skype for Business Server 2015 script for the latest version.

Description

This script will assist in getting servers ready for the installation of Microsoft Lync Server 2013 on Windows Server 2012 and Windows Server 2012 R2. This includes the operating system prerequisites, SQL Express (where necessary), Silverlight, and more. Some post installation options are also available, and include Microsoft tools such as the debugging tools, the Best Practices Analyzer (BPA), Connectivity Analyzer, and more. Where the script needs files available online, it will automatically download them. More options will be added as I have time, and can properly test. This includes Edge, Director, Front End, Office Web Apps, Persistent Chat, and Mediation server prerequisites, and more tools. If you have suggestions, please feel free to comment below.

In the event that the server needs to be rebooted before prereqs can continue, it will automatically restart the script and continue after you reboot and login again.

The current options are:

1. Director – Installs the OS prerequisites and SQL Express instances required to install this role.

2. Edge – Installs the OS prerequisites and SQL Express instances required for this role. It also verifies the server is not domain joined, then goes through the process of setting the primary DNS suffix (same as option 50-13). Also configures NICs to remove DNS and gateway from the internal NIC, remove dynamic registration in external NIC, and prompt to disable both lmhosts and NetBIOS over TCP/IP.

3. Front End – includes the Operating System prerequisites, Microsoft Silverlight, as well as the installation of SQL Express SP2 and creation of the various required instances. The SQL Express installs are done because Lync Server installs the RTM version by default. So installing the SP2 version saves a long update later. Note that each instance takes 3-5 minutes to install – longer on slower machines. Enterprise edition servers have two instances, RTCLocal and LyncLocal, and Standard edition servers also have the RTC instance. Choosing the Front End option will ask if it’s a Standard Edition server. This option will also prompt (if the firewall is enabled) if you’d like the required firewall exceptions created for my Get-CsConnections.ps1 script. This option will also prompt if the Lync Room System Admin Portal will be installed. If you select Yes, the ASP.NET MVC 4 for Visual Studio 2010 SP1 and Visual Web Developer 2010 SP1 prerequisite for that is installed.

4. Mediation – Installs the OS prerequisites required and the RTCLocal SQL instance.

5. Office Web App – Installs the OS prerequisites required, then installs the Office Web App binaries, and then prompts to install the English language pack, followed by the most recent cumulative update. Almost everything needed to deploy an Office Web Apps server. This option also verifies that Windows Update settings are NOT set to automatic, as that is not recommended.

6. Persistent Chat – Installs the OS prerequisites and SQL instance required for this role.

7. Lync Server 2013 Resource Kit – tools that make troubleshooting and administrating a Lync environment easier, such as Address Book config, etc.

8. Lync Server 2013 Persistent Chat Resource Kit – tools useful for Persistent Chat environments.

9. Lync Server 2013 Debugging Tools – includes the logging tools such as OCSLogger and Snooper. Helpful for troubleshooting.

10. Lync Server 2013 Stress and Performance Tool – prepare, define, and validate performance

11. Lync Server 2013 Best Practices Analyzer – this tool helps identify any issues from a best practices perspective

12. Lync Server Connectivity Analyzer – identifies any issues that may result in connectivity problems for mobility clients including the Lync Windows Store app

15. Launch Windows Update

16. SCOM Watcher Node prerequisites

17. Custom PortQryUI. PortQryUI is installed, along with a custom config file that adds Lync related options.

18. Install Microsoft Message Analyzer (formerly NetMon)

19. Add custom Scheduler simple URL – if you’d like to have a simple URL for the scheduler app, such as scheduler.contoso.com, this option will handle the configuration of that. Note that this option requires that the simple URL provided be in the Subject Alternative Names (SAN) list of the certificate on your Front End servers. See Understanding the Lync Web Scheduler for additional info.

20. Install SQL Server 2012 Management Studio

21. ARR (“Pirate Proxy”) prerequisites. This installs the Windows features, and downloads the Web installer. It also verifies the server is not domain joined, then goes through the process of setting the primary DNS suffix (same as option 50-13). Also configures NICs to remove DNS and gateway from the internal NIC, remove dynamic registration in external NIC, and prompt to disable both lmhosts and NetBIOS over TCP/IP.

24. Microsoft Unified Communications Managed API 4.0, Runtime (UCMA 4.0) – this is required if you’re going to run sefautil.exe from the resource kit. It’s still recommended that sefautil.exe be used on a dedicated box.

28. Configure Skype Federation. This removes the MSN Public Provider and adds the Skype Public Provider, complete with icon. Download includes the Lync-Skype Provisioning Guide. See http://blogs.technet.com/b/lync/archive/2013/05/23/lync-skype-connectivity-available-today.aspx for more info.

30. Wireshark. This downloads the installer, and two compiled macro exe files and runs them. The first installs WireShark, and the second configures WireShark for optimized Lync tracing, including the steps recommended by Matt Landis (Getting Started With Lync and Wireshark: Tips & Quirks) and Jeff Schertz (Wireshark Capture Tips). That config includes:

  1. adds Source Port (resolved) column
  2. adds Destination Port (resolved) column
  3. adds DSCP column
  4. Configures RTP protocol “Try to decode RTP outside of conversations”
  5. Configures SIP protocol for ports 5060-5068 (instead of WireShark’s default of 5060)
  6. Sets the time format to human readable format

31. Enable Photo URL option. Enables the photo URL option in the client. See http://www.lynclog.com/2013/11/lync-2013-client-and-and-pictures-from.html for more info.

34. Lync Room System (LRS) Admin portal prerequisites.

36. Create Lync file share on local computer. This creates a file share on the local computer called “LyncShare”, and assigns the basic NTFS and share rights. This can then be added to the Lync Topology Builder.

50. Misc server config menu.

  1. Install/Update Lync Server 2013 Documentation Help
  2. Create scheduled task to automatically update PowerShell help files daily. I discuss this in Function: New-PSUpdateHelpScheduledTask – Auto Update PowerShell Help
  3. Install telnet client
  4. Disable automatic updates. The automatic updating of Lync servers isn’t recommended due to the additional manual steps that must take place. And it’s not supported at all on Office Web Apps servers.
  5. Set recovery of Lync and/or OWAS services to “restart”. See Set recovery of Lync services to “restart” for more info.
  6. Set fabric logging to circular. See Tom’s excellent article at Check your lync server windows fabric log size with PowerShell
  7. Disable Server Manager on logon. For those of you who hate that it always pops up when logging in.
  8. Upgrade to PowerShell v4.0. This is for Windows Server 2012 RTM (not R2) boxes that still have the default PowerShell v3.0 on them. Upgrading PowerShell both before and after Lync Server is installed is supported.
  9. Fix Control Panel font. Reverts the font in the Control Panel back to the original Segoe UI. See Resetting the Font in Lync Server Control Panel – Goodbye Times New Roman!
  10. Set server power plan to “High Performance”. See https://www.ucunleashed.com/2558
  11. Open HOSTS file in notepad for editing. This is convenient on edge servers.
  12. Configure edge static routing – adds the static routes for all private address ranges to use the internal NIC. The user is prompted with a list of NICs discovered, and asked to pick which will be used for the internal connection. Once picked, the script will determine if there is already a gateway defined. If so, it will use that IP address to create the static routes. If there is no default gateway assigned, the user is prompted to enter the gateway that the static routes should use. The DNS server config is removed from the internal NIC. The gateway on the internal NIC is removed. A prompt will appear, and if accepted, lmhosts lookup is disabled on all NICs. Another prompt will appear, and if accepted, NetBIOS over TCP/IP is disabled.
  13. Configure primary DNS suffix. This prompts for a domain name, assigns it as the primary DNS suffix, then reboots. This configuration is required for edge and ARR (reverse proxy) servers.

60. Desktop shortcuts menu. This is basically an enhanced menu driven version of Create a Shutdown/Restart/Logoff Windows 8 Tile for the Start menu (PowerShell) that puts easy to reach tiles on the Start screen. The available tiles are:

  1. Logoff
  2. Restart
  3. Shutdown
  4. Windows Update
  5. Lync Server Management Shell
  6. Lync Server Deployment Wizard
  7. Lync Server Control Panel
  8. Exchange UM Integration Utility (OcsUmUtil)
  9. Snooper
  10. OCSLogger Logging Tool
  11. Lync Server Topology Builder
  12. Certificate Management (local machine)
  13. Active Directory Users and Computers (ADUC)
  14. Microsoft Message Analyzer
  15. Notepad Desktop Shortcut for Edge servers to open the HOSTS file

70. Taskbar shortcuts menu. These options create shortcuts on the taskbar for commonly used tools.

  1. Lync Server Management Shell
  2. Lync Server Deployment Wizard
  3. Lync Server Control panel
  4. Exchange UM Integration Utility (OcsUmUtil)
  5. Snooper
  6. OCSLogger Logging Tool
  7. Lync Server Topology Builder
  8. REMOVE shortcut for PowerShell
  9. Certificate Management (local machine)
  10. Active Directory Users and Computers (ADUC)
  11. Microsoft Message Analyzer
  12. REMOVE Windows App Store shortcut (Windows Server 2012 R2)

80. Downloads only menu. This menu shows options for download (only) of some key Lync related products.

  1. 1. Download latest Lync Server 2013 Cumulative Update
  2. Lync Server 2013 Watcher Node
  3. Lync Server 2013 Management Pack & Documentation
  4. Lync 2013 Rollout and Adoption Success Kit (RASK)
  5. Lync Server SDN API 2.1 (includes the API installer, the management utility, the docs, and the .chm file)
  6. Lync Online Admin components
  7. Event Zero connector

90. Security menu. This menu has a few related security options

  1. Disable SSL 2.0
  2. Disable SSL 3.0
  3. EnableSessionTicket: Event IDs 32402, 61045 are logged in Lync Server 2013 Front End servers that are installed on Windows Server 2012 R2 (KB 2901554)

Simply choose your desired option. When the script is finished, it will return to the menu.

Note: The installation of some Lync Server 2013 roles requires some .Net 3.5 components, which are not installed in Windows Server 2012 by default. So the script will need to know where your Server 2012 installation media is. The script defaults to the CD-ROM/DVD-ROM drive with the lowest drive letter (typically D: or E:), but can be configured for other locations.

The script will also create a log file that can be used for troubleshooting. The log file is created in a logs folder inside the $TargetFolder (by default, c:\_install). This log file should be included when reporting any bugs.

Syntax

C:\Set-Cs2013Features.ps1 [-TargetFolder ] [-Win2012Source ]
[-SQLPath ] [-InitialMenuOption ] [-IncludeSSMS] [-IncludeTelnet] [-IncludeFW] [-IncludeHighPower]
[-IncludeStandard] [-DownloadOnly] [-Tail] [-WhatIf] [-Confirm] [-IncludeTotalCount] [-ClearRunningStatus] []

Examples

Set-Cs2013Features.ps1

This will launch the script with the default options for Enterprise edition servers

Set-Cs2013Features.ps1 -Win2012Source e:

This will launch the script using the e: drive for the source of the Windows Server 2012 installation files

Set-Cs2013Features.ps1 -sqlpath "d:\sqlexpress"

This will install any related SQL Express instances to the specified path

Parameters

-TargetFolder

Defines the location for any downloaded files. Defaults to “c:\_install”. Additionally, log files generated by this script are located in a subfolder of TargetFolder called “logs”. TargetFolder does not support paths with spaces. UNC paths are acceptable provided they are not hidden, such as \\server\share$.

-Win2012Source <String>

Defines the location of the Windows Server 2012 installation files. This is needed to install .Net 3.5 since those files are not installed on the server by default. Defaults to first detected CD-ROM/DVD drive. UNC paths are acceptable provided they are not hidden, such as \\server\share$. Unmounted .ISO images are also supported.

-SQLPath

Defines the desired installation path for SQL Express. Defaults to “c:\Program Files\Microsoft SQL Server”

-InitialMenuOption

Allows you to start the script with the option you want, without first displaying the menu.

-IncludeSSMS []

If specified, will include SQL Server Management Studio automatically when prereqs for Front End servers are installed. If not specified, a prompt will appear.

-IncludeTelnet []

If specified, will include Telnet automatically when prereqs for Front End servers, Director servers, Mediation servers, Edge servers, and/or Persistent Chat servers are installed. If not specified, a prompt will appear.

-IncludeFW []

If specified, will include the firewall rules for Get-CsConnections automatically when prereqs for Front End servers are installed. If not specified, a prompt will appear.

-IncludeHighPower []

If specified, tells the script to automatically set the Power Config on the server to High Power. This is instead of the script prompting.

-IncludeStandard []

If specified, tells the script to include the extra SQL Express instance required for Standard Edition front end servers. This is instead of the script prompting.

-GetInfoFromRegistry []

This value is only used during mid-prereq reboots. It is automatically set and read by the script, and should not be manually specified.

-DownloadOnly []

Tells this script to not install or configure anything – just download the files for the option you select. This is useful if you’re going to be building servers that do not have Internet access and want to fetch the files beforehand.

-DownloadAll []

Tells this script to not install or configure anything – just download ALL of the files. This is useful if you’re going to be building servers that do not have Internet access and want to fetch the files beforehand. Note that a complete set of files is currently around 3.8GB.

-Tail

 Shows a tail of the log file as it’s written. It automatically restarts if the script reboots the server, too. Really only beneficial for troubleshooting.

-ClearRunningStatus

Resets the warning flag if the script didn’t close gracefully and you get the “The script is already running” error.

Installation

WARNING!

An issue has been identified in Windows Server 2012 servers that are built as Server Core, but converted later to Server with GUI. Installation of Windows Features, either manually or via a script, fail if Windows Updates are installed BEFOREHAND. That being the case, this script cannot be used in such scenarios. I’m working on detecting (if possible) servers that are converted, as well as researching why they fail. Thanks to John for pointing it out. It’s likely that the issue detailed here is the cause.

Execution Policy: Third-party PowerShell scripts may require that the PowerShell Execution Policy be set to either AllSigned, RemoteSigned, or Unrestricted. The default is Restricted, which prevents scripts – even code signed scripts – from running. For more information about setting your Execution Policy, see Using the Set-ExecutionPolicy Cmdlet.

Donations

I’ve never been one to really solicit donations for my work. My offerings are created because *I* need to solve a problem, and once I do, it makes sense to offer the results of my work to the public. I mean, let’s face it: I can’t be the only one with that particular issue, right? Quite often, to my surprise, I’m asked why I don’t have a “donate” button so people can donate a few bucks. I’ve never really put much thought into it. But those inquiries are coming more often now, so I’m yielding to them. If you’d like to donate, you can send a few bucks via PayPal at https://www.paypal.me/PatRichard. Money collected from that will go to the costs of my website (hosting and domain names), as well as to my home lab.

Frequently Asked Questions

Question: Why doesn’t this script support Windows Server 2008 R2?

Answer: I get asked this all the time. There are several reasons. The first is that out of the box, Server 2008 R2 has PowerShell 2.0 installed, and this script is written in PowerShell 3.0. Requiring you to upgrade to PowerShell 3.0 first, before running a script that installs prerequisites, seems counter-intuitive. And converting the script to just use PowerShell 2.0 is taking a step backwards, especially considering that the current version of PowerShell is 4.0, and even as this is written, 5.0 is in preview.

Next is sheer time. I test changes I make. And then I test them again. And then I choose different options and combinations and test them. Testing on just Server 2012 and Server 2012 is exhausting. Adding Server 2008 R2 would mean even more testing, plus I’d have to add those resources in my already overtaxed test labs. That would slow down my ability to add new features and test fixes.

Third is that Server 2008 R2 is two versions back. Get with the times already!


Question: Can you add feature x?

Answer: I LOVE getting feature requests. Seriously! Best method to suggest features is to send me an email. My email address is in the comment section at the top of every script I release. Please be detailed in what you’d like to see, as well as any scenarios you’d use the option (so I can try to duplicate testing).


Question: How do I submit bug reports?

Answer: Email is best. Grab my email address from the comment section at the top of the script. Please be VERY detailed. Please include screen shots if possible, and ALWAYS include the log file (by default, it’s in c:\_install\logs). If you’re not using the latest version of the script, please download it and see if you can duplicate the problem before reporting it.


Question: What if my server doesn’t have Internet access?

Answer: Fear not. Download the required files using either the -DownloadOnly or -DownloadAll options from another machine and place them in the TargetFolder, which is c:\_install by default. The script looks to see if the file is available locally before attempting to download.


Question: When I run the script again, I get “Script already running”

Answer: This is because the script didn’t exit gracefully. Many reasons this can happen, such as rebooting the server while it’s still running. If you’re positive it’s not running anywhere else (including by other users logged into the same server), run the script with the -ClearRunningStatus switch to clear that flag. Then run it as normal.

Download

v3.8 – 03-25-2015 – Set-Cs2013Features.v3.8.zip

v3.7 – 02-27-2015 – Set-Cs2013Features.v3.7.zip

v3.6 – 02-12-2015 – Set-Cs2013Features.v3.6.zip

v3.5 – 02-02-2015 – Set-Cs2013Features.v3.5.zip

v3.4 – 01-26-2015 – Set-Cs2013Features.v3.4.zip

v3.3 – 01-07-2015 – Set-Cs2013Features.v3.3.zip

v3.2 – 12-22-2014 – Set-Cs2013Features.v3.2.zip

v3.1 – 10-24-2014 – Set-Cs2013Features.v3.1.zip

v3.0 – 10-06-2014 – Set-Cs2013Features.v3.0.zip

v2.9 – 09-22-2014 – Set-Cs2013Features.v2.9.zip

v2.8 – 08-13-2014 – Set-Cs2013Features.v2.8.zip

v2.7 – 06-26-2014 – Set-Cs2013Features.v2.7.zip

v2.6 – 06-10-2014 – Set-Cs2013Features.v2.6.zip

v2.5 – 05-24-2014 – Set-Cs2013Features.v2.5.zip

v2.4 – 04-29-2014 – Set-Cs2013Features.v2.4.zip

v2.3 – 02-08-2014 – Set-Cs2013Features.v2.3.zip

v2.2 – 01-20-2014 – Set-Cs2013Features.v2.2.zip

v2.1 – 12-17-2013 – Set-Cs2013Features.v2.1.zip

v2.0 – 11-26-2013 – Set-Cs2013Features.v2.0.zip

v1.9 – 10-28-2013 – Set-Cs2013Features.v1.9.zip

v1.8 – 08-01-2013 – Set-Cs2013Features.v1.8.zip

v1.7 – 05-31-2013 – Set-Cs2013Features.v1.7.zip

v1.6 – 05-24-2013 – Set-Cs2013Features.v1.6.z1p

v1.5 – 05-10-2013 – Set-Cs2013Features.v1.5.zip

v1.4 – 05-03-2013 – Set-CsLync2013Prerequisites.v1.4.zip

v1.3 – 04-29-2013 – Set-CsLync2013Prerequisites.v1.3.zip

v1.2 – 04-01-2013 – Set-CsLync2013Prerequisites.v1.2.zip

v1.1 – 02-28-2013 – Set-CsLync2013Prerequisites.v1.1.zip

v1.0 – 02-08-2013 – Set-CsLync2013Prerequisites.v1.0.zip

Changelog

See the changelog for information on what’s changed/included in each version.

Retrieving “Missing” Start Menu Items for Lync Server 2010

August 11th, 2012 No comments

When you install your first Lync Server in a 2010 environment, you see many options in the Start Menu such as the Lync Server Control Panel, Lync Server Management Shell, Topology Builder, etc.

Start Menu shortcuts on first server installed

Start Menu shortcuts on first server installed

However, when you install subsequent servers in the same environment, some of those options, like the Control Panel and the Topology Builder, are not listed.

Start Menu shortcuts on subsequent servers

Start Menu shortcuts on subsequent servers

That’s all fine and dandy if you’re always going to use the first server to perform those tasks. But what if that server is not available?

I’m completely OCD, and I like to have everything match perfectly. So – here’s how to get all of the options on each server. Open up Windows Explorer and go to the installation files for Lync. Browse to \Setup\amd64\Setup and run admintools.msi. Click ‘Yes’ on the UAC prompt.

Administrative Setup Tools UAC screen

Administrative Setup Tools UAC screen

At the Welcome screen, as shown below, click Next.

Admininstrative Tools Setup welcome screen

Administrative Tools Setup welcome screen

Carefully read the End-User License Agreement. If you agree, click the check box, then click Next.

Administrative Tools Setup license screen

Administrative Tools Setup license screen

At the destination folder screen, it should default to your Lync installation folder, which, by default, is c:\Program Files\Microsoft Lync Server 2010\. Click Next.

Administrative Tools Setup destination folder

Administrative Tools Setup destination folder

At the ready screen, click Install.

Administrative Tools Setup ready screen

Administrative Tools Setup ready screen

At the Completed screen, click Finish.

Administrative Tools Setup completed screen

Administrative Tools Setup completed screen

And now we have the shortcut items. Our OCD now settles down, and we can use these tools on each server.