Archive

Archive for January, 2018

Function: Get-CsMaliciousCalls – Retrieve Records for User Reported Malicious Calls in Skype for Business

January 25th, 2018 No comments

Description

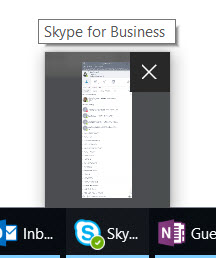
A little known feature in Skype for Business is the ability for a user to report a malicious call that they’ve received. This can be done by going to Settings>Tools>Report a Call…, as shown below.

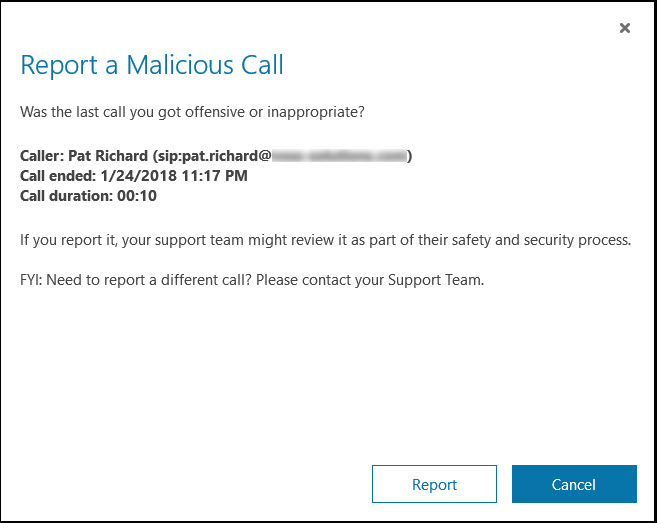
At that point, the user is presented a dialog that allows them to report the just completed call:

If you don’t see the ‘Report a Call…’ option in your client, ensure that the option is enabled in the appropriate voice policy. It can be enabled by setting EnableMaliciousCallTracing to $true, such as

Set-CsVoicePolicy -Identity Global -EnableMaliciousCallTracing $true

Clients will pick up that setting at the next policy refresh.

When the call is reported, info is inserted into the ErrorReportView table of the LcsCDR database. However, unless you’re querying for it, you don’t see it, and many don’t even know where it is, or that it’s even there. It doesn’t do much good if your users are reporting the calls, but you have no way to view the data.

There are a couple of ways you can retrieve the data. The first is some custom reports in your Monitoring Server’s reports. Next is a simple SQL query in SQL Server Management Studio against the LcsCDR database for records with a diagnostics ID of 51017. Just use the following:

SELECT * FROM [LcsCDR].[dbo].[ErrorReportView] WHERE [MsDiagId] = '51017'

The last option is to use PowerShell to make the query against the SQL server for the same info. SQL queries in PowerShell are nothing new. They’re relatively fast, and you end up with an array that can be handled like any other object in PowerShell. If you’re using the default instance of SQL server for the LcsCDR database, use the function like this:

Get-CsMaliciousCalls -Server [server name]

If you’re using a named instance, you can just add the instance name to the command, such as this:

Get-CsMaliciousCalls -Server [server name] -Instance [instance name]

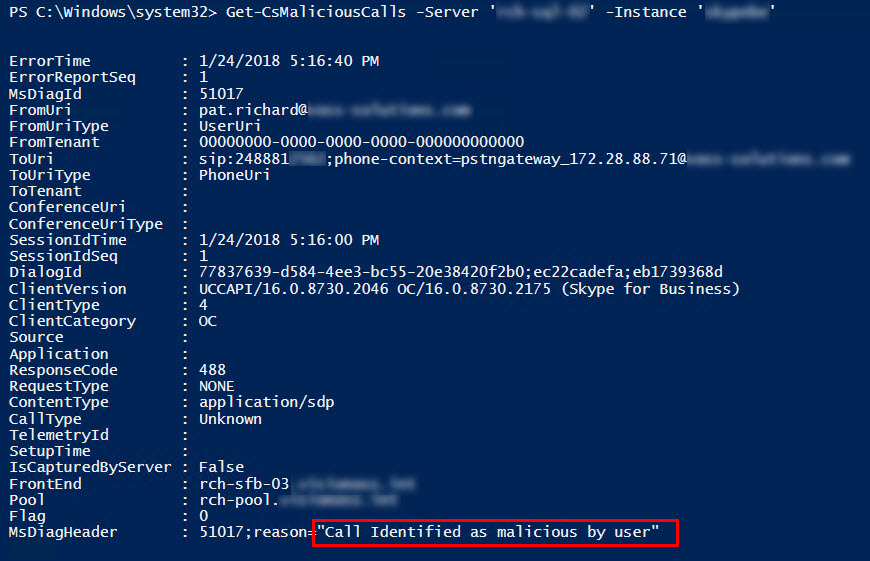
As you can see from the screenshot below, the function will return objects with plenty of info. Note that the FromUri field is the user reporting the malicious call (callee), and the ToUri is the caller. We see the MsDiagHeader notes the reason as “Call Identified as malicious by user”.

Obviously, what you do with the information is up to you. You could use PowerShell to further filter the ToUri into an e.164 number and use that to block numbers at your gateways. Or, use an MSPL script on the front end/mediation servers to drop calls with that number. Quite a few possibilities. If you come up with more ways to use the data, drop me a line or post a comment below. For now, toss the function in your PowerShell profile and enjoy your new data view.

Download

This script is available in my GitHub repo at https://github.com/patrichard/Get-CsMaliciousCalls. Feel free to grab it from there, and contribute any updates or improvements.

UC Inside Track: Episode 4: Call Queues, User Groups, client updates, and Career Path with special guest Josh Blalock

January 22nd, 2018 No comments

The podcast steamrolled ahead with another great discussion. Fellow MVP Josh Blalock stopped by and we had a great chat about several topics. In this episode, we look at the following:

  1. What are Call Queues and their new features in Skype for Business Online
  2. Updated training materials in MyAdvisor.fasttrack.microsoft.com
  3. Skype for Business client updates and differences between MSI and CSR versions of clients
  4. Career path options for UC professionals

Episode 4: http://www.voss-solutions.com/media/podcast/podcast_004.mp3

UC Inside Track is available directly via the link above, via RSS, iTunes, TuneIn, Google Music Play, and Podcast Addict.

Function: Get-CsPhoneNumberAssignment – Find Where a Number is Assigned in Skype for Business

January 22nd, 2018 1 comment

Description

One of the problems that can be truly maddening when troubleshooting issues is a 485 ‘ambiguous’ error in Snooper. This is when Skype for Business doesn’t know what to do with an inbound call because the number being called is configured in more than one place. Skype for Business will complain if you try to configure a number more that once in SOME areas, such as several users, but not in all areas. So you’re left with hunting around for a while to figure out where else the number is defined. Meanwhile, users are complaining that calls aren’t working. So I came up with a quick function that will look through all of the areas that a number can be defined, and will list all matches. Additionally, you can use the script to verify that a number is NOT assigned somewhere before assigning it to a resource.

Yes, I know that others have done similar things, notably Tom Arbuthnot’s Get-LyncNumberAssignment :Find #Lync Users/Objects by Phone Number/LineURI #PowerShell and Amanda Debler’s Is that Skype for Business (Lync) Number Free?, as well as other phone number management solutions such as those by Stale Hansen and Lasse Nordvik Wedø. I’ve had a previous version of my script in my profile for a long time and decided to clean it up and make it available.

Is that Skype for Business (Lync) Number Free?

This PowerShell function will look for a full or partial number to see where it is allocated. It looks at the following:

  • User LineUri
  • User PrivateLine
  • Meeting Room LineUri
  • Meeting Room PrivateLine
  • Analog Devices
  • Common Area Phones
  • Unified Messaging (UM) Contacts
  • Dial-In Conferencing Access Numbers
  • Trusted Application Numbers
  • Response Group Numbers

The function accepts input via the named LineUri parameter, or via pipeline. It returns a typical PowerShell object. Here is an example of specifying a full e.164 number.

Get-CsPhoneNumberAssignment -LineUri 12145551212

Example: Specifying a full e.164 number results in a single match. In this case, a user. Click image for larger view.

Specifying a partial number will likely show more matches.

Get-CsPhoneNumberAssignment -LineUri 1214

Example: Specifying a partial number results in several matches. In this case, some users and a dial-in access number. Click image for larger view.

Note that since it must look at all of the related objects in order to build the object, it can take a minute or so to complete. But at least now there is a single command you can run to look in all areas.

Download

This script is available in my GitHub repo at https://github.com/patrichard/Get-CsPhoneNumberAssignment. Feel free to grab it from there, and contribute any updates or improvements.

One Liner: Getting Your Public IP Address With PowerShell

January 12th, 2018 1 comment

My friend Matt (@MatthewDippel) was espousing the clean results that https://wtfismyip.com provides over more popular sites like http://www.whatismyip.com. Matt noted that other than the explicit language on wtfismyip.com, the results were cleaners and easier to use that others. Matt’s a developer, so I had to give him some grief that he used a web page instead of writing some code. I figured I should share that code here, because in ten minutes, I’ll forget what it was, and need to look it up some time in the future.  🙂

The information is fairly straight forward to retrieve, assuming you can find a source that provides it. dnsomatic.com is one such site. If you see the documentation for developers at http://www.dnsomatic.com/wiki/api, you can see that they provide an example of browsing to http://myip.dnsomatic.com returns the public IP of the client requesting the page. That being the case, we can use something simple like invoking a web request in PowerShell to get that data. Easy peasy. We can just look at the content value of the returned results:

(Invoke-WebRequest 'http://myip.dnsomatic.com').Content

And we see that it returns just a simple text value of our public IP address:

VERBOSE: GET http://myip.dnsomatic.com/ with 0-byte payload
VERBOSE: received 13-byte response of content type text/html
173.10.47.133

Now, we can expand on that a bit, albeit getting away from the one-liner concept. We can take the results of the above query and send them to the GEO IP service at webservicex.net and get some geo info:

$ip = (Invoke-WebRequest "http://myip.dnsomatic.com").Content
$geoip = New-WebServiceProxy "http://www.webservicex.net/geoipservice.asmx?WSDL"
$geoip.GetGeoIP($ip)

For more info on WebserviceX’s geo lookup, check out http://www.webservicex.net/New/Home/ServiceDetail/64.They’ve got some other cool solutions, including retrieving weather data, at http://www.webservicex.net/new/Home/Index.

And what we see here is

VERBOSE: GET http://myip.dnsomatic.com/ with 0-byte payload
VERBOSE: received 13-byte response of content type text/html
ReturnCode        : 1
IP                : 173.10.47.133
ReturnCodeDetails : Success
CountryName       : United States
CountryCode       : USA

We see where we get the country name and code as well.

BTW – I found another source of IP info that also doesn’t require cleanup. And that is Matt’s new favorite, wtfismyip.com.

(Invoke-WebRequest 'https://wtfismyip.com/text').Content

I’m happy to add others to this list if you send me the info.

You’ll notice the verbose output in the above examples. If you want to suppress the verbose output, we can do that with the -Verbose parameter, setting it to $false:

(Invoke-WebRequest 'https://wtfismyip.com/text' -Verbose:$false).Content

As you can see, getting your public IP address is fairly straightforward.

The Case of the Missing Skype for Business Presence Options in the Taskbar

January 8th, 2018 1 comment

On Twitter, Noah Sparks (@noahsparks) asked about why some users running Windows 10 can change their Skype for Business presence from buttons that appear when hovering over the Skype for Business taskbar, and others couldn’t. See these two examples taken from my Windows 10 Insider Preview machine.

Hovering over Skype for Business taskbar – no presence controls

Hovering over Skype for Business taskbar – with presence controls

Several people started to hypothesize about the difference, and looking at bitness (32 or 64bit), client source (Click to Run or MSI), and version numbers. Turns out it’s based on the value of a interestingly named registry key called AutoOpenMainWindowWhenStartup. Alexander Holmeset (@alexholmeset) posted the right key and value. I tested it and came up with the following PowerShell code to turn it on. The code basically makes sure you’re running the v16 version of Skype for Business, and then creates the key if it doesn’t exist, and sets the value. If the key does exist, it just sets it. Fire up PowerShell and paste the following. There should be no output.

if (Get-Item -Path 'HKCU:\Software\Microsoft\Office\16.0'){
  if (-Not(Get-ItemProperty -Path 'HKCU:\Software\Microsoft\Office\16.0\Lync' -Name 'AutoOpenMainWindowWhenStartup')){
    $null = New-ItemProperty -Path 'HKCU:\Software\Microsoft\Office\16.0\Lync' -Name 'AutoOpenMainWindowWhenStartup' -Value 1 -PropertyType DWORD
  }else{
    Set-ItemProperty -Path 'HKCU:\Software\Microsoft\Office\16.0\Lync' -Name 'AutoOpenMainWindowWhenStartup' -Value 1
  }
}

This code has only been tested on my machine, which is running the C2R version of the Skype for Business 2016 client. I noticed it only works when the taskbar icon is there, and doesn’t seem to work over the systray icon – but then again, there are already presence options when you click on the systray icon anyways. I haven’t tested with any other version of the Skype for Business client, nor on any other operating system. If you do test it with other platforms, please report your findings and I’ll update this post. To set it back (disable the presence options when hovering), just set the registry value to zero, such as shown below.

Set-ItemProperty -Path 'HKCU:\Software\Microsoft\Office\16.0\Lync' -Name 'AutoOpenMainWindowWhenStartup' -Value 0

Another mystery solved!

UC Inside Track: Episode 3: Huge Teams Features Release with special guest Matt Landis

January 5th, 2018 No comments

In this first episode of the new year, special guest Matt Landis and I discuss the whopper release of new features for Microsoft Teams, and how they relate to Skype for Business. They include:

New Calling Roadmap Features

  1. Simultaneous Ringing
  2. Speed dial
  3. Suggested Contacts
  4. Voicemail
  5. Translate user input to standard format phone number
  6. Call Quality Diagnostic Portal
  7. TTY Support
  8. Skype for Business-Teams Calling
  9. Blind Transfer
  10. Call Blocking
  11. Call Forwarding
  12. Caller ID masking
  13. e911 Support
  14. Extension Dialing
  15. Hold
  16. Multi-call Handling
  17. Enable Existing Calling Plan Support

New Meetings Roadmap Features

  1. Edge, Chrome Browser Support for meetings
  2. Interactive Troubleshooting
  3. Audio Conferencing in over 90 countries
  4. Mute Other Participants
  5. Application Sharing

New Messaging Roadmap Features

  1. Contact Groups
  2. Unified Presence

New IT Pro Roadmap Features

  1. Messaging Policies
  2. Teams Interop Policies
  3. Client Support

Delayed Features

  1. Enable Call Quality Analytics
  2. Lobby Support
  3. Anonymous Join
  4. Give and Take control in sharing

Episode 3: http://www.voss-solutions.com/media/podcast/podcast_003.mp3

UC Inside Track is available directly via the link above, via RSS, iTunes, TuneIn, Google Music Play, and Podcast Addict.