Automatically Installing and Configuring WireShark for Skype for Business
 Description
I mention in the blog article Script: Set-Cs2013Features.ps1 – Easily Install Prerequisites and Tools for Microsoft Lync Server 2013 that one of the options in the menu, #30, is download, install, and configure WireShark on Windows Server. The configuration settings are based on those mentioned by Jeff Schertz (Wireshark Capture Tips) and Matt Landis (Getting Started With Lync and Wireshark: Tips & Quirks) , as well as those I’ve found useful. Most of these settings REALLY help when you’re looking at traces (and who doesn’t love an afternoon of doing that?). Among some of the configuration settings are:
- adds Source Port (resolved) column
- adds Destination Port (resolved) column
- adds DSCP column
- Configures RTP protocol “Try to decode RTP outside of conversations”
- Configures SIP protocol for ports 5060-5068 (instead of WireShark’s default of 5060)
- Sets the time format to human readable format
Why manually configure these on your server (or worse, many servers), if we can automate it? Let’s make our deployment life easier. Getting WireShark installed programmatically isn’t like other programs. There is no .msi file, or silent install switches. Methods I’ve used in other scripts just didn’t work. And believe me, I tried. And tried. And tried. So, I went medieval on it, and used AutoIt to create a macro that steps through the installer, clicking the right buttons. This works exceptionally well, and is fairly fast. But I wanted to also include the configuration steps mentioned above. And this is where it got interesting. WireShark’s config file seems to change formats and details often. So writing something that would change the config file directly seemed like it would be a losing battle. So, back to AutoIt. For 95% of the config, it worked great. But there seemed to be a need to click on the custom columns in order to set their name. AutoIt allows for moving the mouse to a certain vector, then clicking. But even with maximizing everything, the coordinates were never the same on different servers with different resolutions or RDP sessions. So that part of it would often not work. You’d get the columns, but they’d be named “New Column”. Not ideal. Finally, after taking a break from trying to figure that out, I rethought about it, and was able to figure out the right keyboard combination to accomplish the same thing. Success! There is one section right after that where the mouse is required to move the new columns into the desired order, but that seems to always work, and there’s no keyboard control for that. A remaining issue has been there since I first started this task. And that is the fact that AutoIt is written to take action based on app windows with certain titles. Usually not an issue at all, except that WireShark has always included the version number in the title bar. So every time there is a new version released, I’d have to open the source file, change the version number, re-compile to an .exe file, test, upload to my server, and update the prereq script. All in all, it is like 10 minutes of work, but I’ll need to continue to do that. As a result, I’m releasing the macros bundled the appropriate version of WireShark. Not sure if that violates some license with WireShark, but since they seem uninterested in making a silent installer method… Download the file from the link below. Unzip anywhere, as long all of the files are in the same folder. You’ll see there are three files:
- The WireShark bits, which are named with the version number, such as Wireshark-win64-2.2.1.exe for version 2.2.1. This is the file as it comes from WireShark.
- The installer macro, which is also named according to the WireShark version it applies to, such as WireShark_2.2.1-install.exe
- The config macro, which is also named according to the WireShark version it applies to, such as WireShark_2.2.1-config.exe
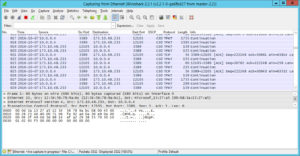
Run the installer macro first by double clicking on it. You’ll see it zip through the WireShark install routine. Once that closes, you can run the config macro. You’ll see it walk though the config. I do NOT recommend running the config macro more than once – lest you end up with a completely mangled config. It takes a minute or so to run. Once it’s done, you can open WireShark Legacy and use it. Once you start a trace, you should immediately be able to see the added columns:

Added columns in WireShark. Click for a larger version.
If you wander through the config menus, you’ll see the other settings as well. The v2.x WireShark application that is also installed when you install WireShark is configured somewhat differently, and I’ll address that in the future. Right now, I’m not aware that it provides any added benefit for Skype for Business/Lync admins anyways. But really, WireShark, would it kill you to use an XML file for your config?! Or registry values? If you have some specific config settings you use for WireShark, pass them along!
Note that this installation has only been tested on Windows Server 2012R2 and later. I haven’t tested this on desktop OSes.
Donations
I’ve never been one to really solicit donations for my work. My offerings are created because *I* need to solve a problem, and once I do, it makes sense to offer the results of my work to the public. I mean, let’s face it: I can’t be the only one with that particular issue, right? Quite often, to my surprise, I’m asked why I don’t have a “donate” button so people can donate a few bucks. I’ve never really put much thought into it. But those inquiries are coming more often now, so I’m yielding to them. If you’d like to donate, you can send a few bucks via PayPal at https://www.paypal.me/PatRichard. Money collected from that will go to the costs of my website (hosting and domain names), as well as to my home lab.
Downloads
WireShark v2.2.12 – 01-19-2018 – WireShark_2.2.12-install.zip
WireShark v2.2.10 – 10-22-2017 – WireShark_2.2.10-install.zip
WireShark v2.2.9 – 09-04-2017 – WireShark_2.2.9-install.zip
WireShark v2.2.7 – 06-01-2017 – Wireshark_2.2.7-install.zip
WireShark v2.2.6 – 04-12-2017 – Wireshark_2.2.6-install.zip
WireShark v2.2.5 – 03-06-2017 – Wireshark_2.2.5-install.zip
WireShark v2.2.4 – 01-31-2017 – Wireshark_2.2.4-install.zip
WireShark v2.2.3 – 12-23-2016 – Wireshark_2.2.3-install.zip
WireShark v2.2.2. – 11-24-2016 – WireShark_2.2.2-install.zip
WireShark v2.2.1 – 10-07-2016 – WireShark_2.2.1-install.zip
Changelog
See the changelog for information on what’s changed/included in each version.


Balls…. cool script, just ran the 2.2.3 version on my edge server, it rebooted for some reason. Haven’t seen that on the previous versions
@Korbyn
The installer is just a macro that looks for specific dialog boxes with specific titles, and clicks on specific buttons. I don’t see a reboot prompt being clicked. That would likely cause the macro to pause.
Hi Pat, this is good stuff. One thing that got me was the fact Wireshark changed how/where to set the decoding of RTP streams (else they just show up as UDP). In the Landis directive, you’ll see it under Edit | Preferences | Protocols | RTP which was right at the time, however that changed in 2.4x to Analyze | Enabled Protocols | “RTP” and enable RTP over UDP. I guess this lends to your statement “WireShark’s config file seems to change formats and details often”
-JW
It would be nice to know which redistributable packages are necessary for these macros.
Windows 10 complains about lack of MSVCR120.DLL… And what is the package?
My bad for not mentioning in the article (which has now been updated). This installation has only been tested on Windows servers, not desktop operating systems.